Pages

Christmas Dinner Side Dishes the Easy Way!


This is my second post about making Christmas easy on the cook so that you/she/he can also enjoy the day.

My first post concerning the turkey and the gravy is here.  I shall now deal with the veggies and side dishes.

The standard Christmas dinner, in addition to the turkey and gravy, includes …

Roast Potatoes or Mashed Potatoes or Both
Roast Parsnips
Brussels Sprouts
Other veg – probably including carrots
Stuffing
Possibly Sausage meat
Bread Sauce
Cranberry Sauce

That seems quite a lot for a chap to prepare on Christmas morning when there is also so much conviviality, present opening and sipping of beverages to accomplish. 

The best thing to do is to prepare/cook everything you can in advance.

If you have read my previous post you will know that the oven will be on at 200°C/400°F/180ºC fan/gas 6 reheating the turkey so it makes sense that all the dishes here than need baking are done so at the same temperature. See a timetable  at the end of this post.

So here goes …

Roast Potatoes


It is possible to do the first half of preparing roast potatoes – the par-boiling bit – a day ahead.  Use a floury potato; Maris Piper, Desiree or King Edward would be good. 1 kilo of potatoes should be enough for 6 people.

On Christmas Eve

~    Peel the potatoes and cut into similar sized pieces so that they cook evenly.
~    Rinse in cold water, put into a large saucepan, cover with cold water and add a sprinkle of salt.
~    Bring to a boil, cover and simmer for 10 minutes.
~    Drain well and shake the potatoes in the strainer to rough up the edges a bit.
~    Spread out in a dish to cool and when completely cold, cover and refrigerate.


On the day, about 70 minutes before service ...

~    Preheat the oven to 200°C/400°F/180ºC fan/gas 6 (if you haven’t already done so).
~    Get the potatoes out of the fridge.
~    Put a little olive or other vegetable oil, goose fat, duck fat or beef drippings into a pan large enough to take the potatoes in one layer without touching. If there is not ½ cm/¼” of fat in the pan add a bit more. Pop into the oven till hot till very hot.
~    Carefully add the potatoes to the hot far and turn gently to coat.
~    Roast for 40-45 minutes till crisp and golden – you may turn them over half way through cooking if you wish.


how-to-roast-potatoes
Mashed Potatoes

Mashed potato can certainly be made in advance, chilled and reheated so long as you do it properly!  Firstly, make sure they are nice and creamy and then either …

1.   Heat a little double cream, enough to cover the base, in a saucepan and then stir in the potatoes and continue stirring gently and not too much over medium heat till hot through.  If it seems a bit stiff add more cream.

2.   Make a gratin - put them in an ovenproof dish, dot with butter, sprinkle with breadcrumbs and bake till hot through and golden on top – about 25 minutes.
mashed-potato-gratin
Roast Parsnips

Treat the parsnips exactly as the potatoes but roast them for slightly less time, say 30 minutes, till crisp and golden. You could drizzle with a little honey for the last 5 minutes of cooking.

Incidentally you will see that I have cut the parsnips into slices rather than wedges.  Maybe not quite so pretty but they cook more evenly.

how-to-prepare-roast-parsnips-in-advance-suzy-bowler

Veggies


To be honest I do cook my veg a few minutes before serving the dinner; you can cut them up at leisure during the morning and they only take minutes.

You can, however, if you like cook them ahead of time, even on Christmas Eve if you wish, by cooking in boiling water till only just tender when pierced with the tip of a knife – 3-5 minutes. As soon as they are perfectly cooked and absolutely immediately, drain and refresh in cold water by tipping the cooked vegetables into a large bowl of icy cold water.  This “refreshing”, as we say in the trade, stops any further cooking and keeps their colours bright. Drain and chill till ready to reheat which you will do by either dropping into boiling water and draining after 30 seconds or tossing in a little hot butter till heated through.

brussel-sprouts


Brussel Sprouts


Cook and refresh the brussel sprouts as with the vegetables above. You could also reheat as above but they are even better if sautéed in bacon fat.


Red Cabbage

Red cabbage is perfect because it actually improves with a long rest before serving with time so you can do this 2-3 days in advance.

1 tbsp olive oil
1 red onion finely sliced
1 red cabbage – finely sliced or shredded
2 tablespoons soft light brown sugar
2 eating apples – peeled and sliced
a pinch or two of ground cinnamon
1 tablespoon of  red wine vinegar

~   In a roomy pan with a lid gently cook the onion in the olive oil till starting to soften.
~   Stir in the cabbage and cook for 5 minutes.
~   Add all the rest of the ingredients, stir to mix, put the lid on and cook on low for half an hour.
~   Taste and season with salt, pepper, more cinnamon if you like and maybe some cranberry sauce or even a little port.
~   Cool, chill to needed and reheat by stirring over medium heat (or even in the microwave) to serve.
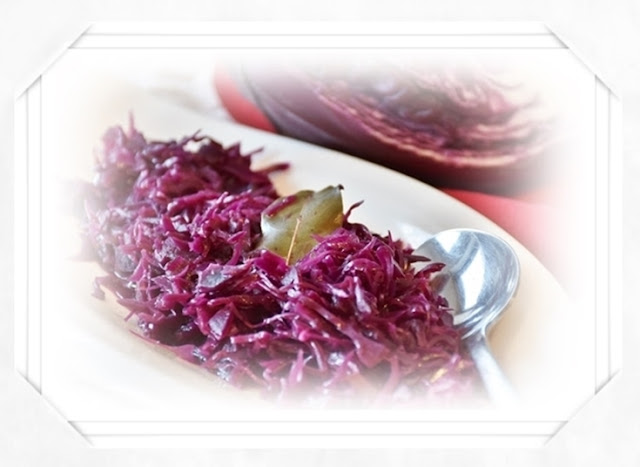
braised-red-cabbage

Possibly Sausagemeat


For the best results, don’t buy sausagemeat in trays, buy your favourite sausages and release the meat from the skins. Much tastier! Roll the sausagemeat into balls and arrange in an ovenproof dish and chill.  Bake for 25-30 minutes.  A cunning plan might be to form the ball loosely in your hand, put a spoonful of cranberry sauce in the middle and form the meat round it to enclose completely. Nice surprise when you eat them!

sausage-balls


Stuffing


As I said in my last post, it is not a good idea to stuff the turkey (even though the stuff is called stuffing!).  Far better is to make it the day before, chill till needed, sprinkle with breadcrumbs, dot with butter and bake till hot, crispy and golden. You could make a packet of stuffing mix or use this recipe …

Homemade Stuffing


3 slices of, possibly stale bread torn into pieces
1 large onion – coarsely chopped
1 stick of celery, a clove of garlic and a carrot also coarsely chopped (all optional)
1 tablespoon vegetable oil
salt and pepper
a little turkey, chicken or vegetable stock
a knob of butter

~   Sauté the vegetables in the oil till tender and starting to turn golden in places.
~   Stir in the bread and then add enough stock to moisten it but not enough that it is sitting in liquid.
~   Add the butter, cover and leave to soak for a few minutes.
~   Stir in any additions (see below), taste, season and stir in a little more stock if necessary.
Whether you make your own stuffing or a bought in mix make it much more interesting by adding something to the basic mixture: sage is a traditional choice and coarsely chopped bacon, crumbled sausagemeat, chestnuts, cranberries, nuts, ham, etc. also spring to mind.

Bread Sauce


This too can be made the day before – here’s my recipe which is not quite authentic but is ever so tasty.

how-to-make-bread-sauce
Pin for future reference!
1-2 slices bread, torn into bite sized pieces
1 tablespoon olive oil or butter
1 medium onion
100ml/3½fl oz hot chicken or veg stock
75ml/2½fl oz double cream

~   Tear the bread into pieces and either allow to go stale or dry out in a hot oven for a few minutes.
~   Thinly slice the onion and cook very gently in the oil or butter till very, very tender. This is easiest done if you press a piece of foil or a butter wrapper directly onto the onions to cover completely and then put on the lid.
~   When soft enough to cut with a wooden spoon and starting to caramelise add the hot stock and the dry bread and bring to a simmer.
~   Stir in the cream, bring to a boil, taste and season then cool, cover and keep in the fridge till needed.
~   To serve reheat gently (stove top or microwave) and dilute as required with more stock, cream or water.


Cranberry Sauce

There are three recipes for Cranberry Sauce in my EasyFestive Food for a Stress-Free Christmas Chunky Homemade Cranberry Sauce, Cranberry & Apple Sauce and Rather Special Mulled Cranberry Sauce all of which can be made in advance but, if you are in a real hurry, open a jar and to make it even more delightful stir in a little port.


no-churn-christmas-ice-creams


Dessert ~ incidentally


Christmas Dinner Timetable


To Serve Christmas Dinner at 2.00 pm


12.00 ~ Remove cooked turkey, potatoes (both mashed and par-boiled), part cooked parsnips, pre-made stuffing and sausage balls out of the fridge to come to room temperature.

12.30 ~ Turn on oven to 200°C/400°F/180ºC fan/gas 6

1.00 ~ Put ½ cm/¼” of fat in the roast potato pan and put in the oven to heat through.

1.15 ~ Turn the par-cooked potatoes in hot oil, spread out a bit so not touching and return the pan to the oven to roast.

1.25 ~ Put a dish with a little oil in it (as with the roast potatoes) in the oven to heat up.

1.30 
~ Turn the par-cooked parsnips in the oil and put in the oven to roast
        ~ Put sausage meat balls in the oven.
        ~ Put mashed potato gratin in the oven, is using.
        ~ Put stuffing in the oven.

1.40 ~ Put turkey legs in oven.

1.45 ~ Put sliced turkey in stock in the oven – if using this method.
        ~ Turn the roast potatoes and parsnips over in their pan if you wish.

1.50 ~ Open cranberry sauce and perhaps stir in a little port.

1.50 ~ Gently heat the mashed potato, red cabbage and bread sauce. Cover and keep warm.
        ~ Boil water for heating vegetables if using that method.

1.55 ~ Reheat vegetables in hot water or melted butter.
        ~ Sauté brussels sprouts in butter or bacon fat.

2.00 ~ GET SERVING!


A Stress-Free Christmas

easy-christmas-recipes

I would, of course, just like to mention my Christmas book Easy Festive Food for a Stress-Free Christmas!

Catering for Christmas can be time consuming, tiring and a bit stressy, so I thought I’d offer some suggestions to make it quicker, easier, more relaxed and perhaps more impressive!

This book does not contain all the information and directions that you can find everywhere in books, magazines and on the net such as roasting times or mince pie recipes. This contains a collection of useful ideas and recipes that as a professional chef I have used over the years to delight guests and customers without knackering myself!


Included are over 50 interesting recipes such as The Quickest, Easiest, Smoothest and Richest Chicken Liver Pâté I know, a super easy but Really Luxurious Bread Sauce and a gorgeous no-churn Christmas Pudding Ice Cream. I have also added every useful idea, hint and tip I can think of!


How to Cook your Turkey the Day Before ~ Perfectly!


I have just read on the Huffington Post that, according to a study by the Food Network ...

“cooking Christmas Dinner is so difficult that it takes 47 years (!) to learn how to do it successfully and that a third of women (it doesn’t mention men) never manage to do it properly!”

Well something that will help a lot is – cook as much of it as possible in advance!  This post concerns the turkey and the gravy.  My next post or two will concern other dishes to prepare in advance. 

As a chef, I have cooked and served numerous Christmas (and, as it happens, Thanksgiving) dinners and I always roasted the turkeys the day before.  Also, domestically, time and time again on Boxing Day when eating pretty much the same meal as the day before, people have remarked how it seems so much nicer the second day.

mulled-wine-roasted-nuts


Now I always roast my turkey in advance, not only is it delicious it also means I can get up late and spend a lot of time sitting around opening presents, nibbling things and sipping festive beverages.

I’ll talk you through it.


~  The Turkey  ~


turkey-weight-calculations
1.   If using a frozen turkey defrost in accordance with the instructions on the wrapper. Completely!!
2.  Cook your turkey on Christmas Eve and start in the morning so that it has plenty of time after cooking to cool before chilling overnight.
3.   Take the fresh or defrosted turkey out of the fridge about an hour before cooking to bring to room temperature.
4.   If the turkey has instructions on the wrapper follow them!
5.   If your turkey has not provided cooking times and instructions see here. 
6.   If there is a bag of giblets inside the turkey remove it. You can either throw it away or simmer the contents in water to make a light stock to add to the gravy. (When I was in the West Indies I seasoned and roasted all the turkey necks and the girls in the kitchen would fight over them – a local delicacy!)
7.   Don’t bother washing it; it is a messy job and cold contaminate your kitchen. Any bacteria will be killed by cooking.
8.   Don’t stuff it!  If you stuff the turkey that will add to the weight and the cooking time; two inconveniences, you don’t need. The stuffing will also cool more slowly than the meat and could be a health hazard. If you cook the stuffing separately it will have a lovely crispy top.
9.   Preheat the oven in accordance with the instructions on the turkey or on the aforementioned website. 
10.   I recommend that you un-truss your turkey, i.e. remove any string or whatever holding the legs together and make it assume the position with legs spread wide.  This way it will not only cook faster and more evenly but it will also result in more crispy skin.  See below for info on crisp skin.
prepare-turkey-for-roasting

11.   Dry the breasts and rub with a little oil, you can use butter; it is tasty but the skin will be softer and more prone to burning. Sprinkle with salt, pepper and maybe other seasonings if you like; herbs, spices etc. 
12.   Season inside the cavity and if you wish put in half a lemon, wedges of onion or  fresh herbs.
13.   Cover loosely with foil and cook in accordance with instructions.
14.   Take the foil off about 45 before the estimated end of cooking to allow the breast to brown.

Is it Done Yet?


how-to-roast-turkey
I don’t think the pop-up timers that some turkeys come with are reliable so instead …

~   If you have a meat thermometer the bird is cooked when it reached 70oC/160oF and incidentally here’s an interesting point, the temperature will actually rise for a short while after taking it out the oven.

~   If you don’t have a thermometer then pierce the thigh meat with a sharp knife and see if the juices run clear.  If there is any blood in them, return the turkey to the oven for another 15 minutes then test again. Another indication of doneness is the drumstick should waggle freely at the joint if you move it.


Cooling & Storing the Turkey


~   When the turkey is cooked cover loosely with foil and set aside to cool.
~   After at least an hour cut the legs and breasts from the turkey – if you cut it too soon delicious juices will be lost, after an hour or so they will have been re-absorbed by the meat.
~   Wrap the cold pieces in cling film and arrange in a container that will easily fit in the fridge.


How to Reheat the Turkey


~  Get the meat out of the fridge half an hour or so before reheating.
~   The legs and maybe the wings – arrange on a baking try, skin side up, and roast in a hot oven 200°C/400°F/180ºC fan/gas 6 for 15-20 minutes to heat through fully and crisp up the skin.
~   The breast meat – there are two ways I would recommend for reheating this meat …

1.   This is the method I use at home when cooking for just a few people.

About 20 minutes before serving bring the gravy (see below for gravy information) just to a boil, turn down the heat and add the sliced breast meat and submerge it in the gravy. Over low heat, watching carefully, return to a simmer. DO NOT allow to boil or the meat will toughen. Cover and set aside.  This way the meat will warm through without the slightest chance of being anything but tender and juicy. Serve the meat from the hot gravy and then, if necessary, reheat the gravy.

2.   Lay the sliced meat in a shallow roasting pan or similar and drizzle with a little turkey broth (that you have made in the roasting pan - see here).  Cover tightly with foil and pop into a hot oven 200°C/400°F/180ºC fan/gas 6 for 10-12 minutes.

As luck would have it 200°C/400°F/180ºC fan/gas 6 is the same temperature you will be cooking the roast potatoes.

~   Crispy skin – obviously, the skin on the breasts will have softened overnight so strip it from the meat, cut into as many pieces as you have guests, spread on a baking tray and then a few minutes before serving pop them in a hot oven the crisp up.  Don’t, of course, get any gravy on them when serving or they will immediately go soggy again.

~  How to Make Gravy with a Bonus!  ~


According to the above quoted article in the Huffington Post ...

“10% of people admit to messing up the gravy”

I also read somewhere that 25% of British people would like to see more interesting flavours of gravy and, at the same time, gravy with more authentic ingredients. 

Tricky!

I would suggest making your own gravy and, if you cook your turkey on Christmas Eve you can calmly make the gravy the following morning rather than rush it at the last minute.  Believe me, making gravy is easy, I promise.  See here for how to make wonderful gravy. 

how-to-make-gravy-suzy-bowler

There is an added bonus to making gravy the day after cooking the turkey; instead of carefully pouring the liquid fat from the top of the meat juices, If you have chilled the meat juices left from the day before the fat will have risen and solidified and be so much easier to deal with. 


Dessert ~ incidentally


To Further Help with Christmas


Catering for Christmas can be time consuming, tiring and a bit stressy, so I thought I'd offer some suggestions to make it quicker, easier, more relaxed and perhaps more impressive. 


A Genius Idea for Food Scraps


~ Food Collections ~

I have written before of the sheer handiness of having collections of this and that but it is worth repeating and going into more detail.  

Collecting your scraps saves money, avoids food waste, allows for spontaneity and can make you happy with the delicious food you make! 

The idea is simple – group together similar scraps and leftovers in the fridge or freezer, as appropriate, and add to them till you have enough to make something delicious.  For instance …

Bread Scraps


I always keep bits of unwanted bread in the freezer, they can be used in so many ways. Here are some of them …

delicious-ideas-for-bread-scraps
~  bread pudding
~  French toast pancakes,
~  stuffing,
~  breadcrumbs
~  croutons
~  bread sauce, and
~  7 interestingly different ideas for leftover bread


delicious-ideas-for-cheese-scraps

Cheese Scraps


I keep this collection in a box at the back of the fridge. Wrap the cheeses loosely in parchment or greaseproof paper and then store in plastic bags in the box. A scrap of cheese can be good added to egg dishes, mashed potatoes, pasta sauces and so on. Here are 64 ideas for leftover cheese I wrote about earlier! 

ideas-for-pastry-scraps


Pastry Scraps


Every time I make my real man a pie (just about weekly) I add the pastry trimmings to my collection so that I can make these delicious pastry recipes.


Raw Meat Trimmings


Steak in particular – when cooking professionally and cutting up a whole tenderloin or sirloin etc. any good quality trimmings and undersized pieces I used to make Peppered Steak Salad. 

how-to-use-meat-scraps


Other meats - when there are enough scrappy bits I make stock.   Better quality trimmings, both raw and cooked can be added to soups, stir fries, risotto, pasta dishes etc.  Sometimes if the meat is all good quality but a little fatty I make burgers, they are very easy. Not necessarily beef burgers, however, here is a great recipe using pork trimmings ...

BBQ Pork Burgers


2 rashers bacon – I like smoked
1 tsp paprika
1 tsp dark brown sugar
½ tsp salt
500g good quality pork scraps – minced or fairly finely chopped
1 tbsp oil
BBQ sauce

~   Coarsely chop the bacon and cook, preferably in its own fat, till crisp.  Drain on kitchen roll.

~   Mix together the next 3 ingredients.

~   Form the chopped meat into two or three burgers.  People sometime ask me what I add to burgers to keep them together e.g. egg or breadcrumbs but the answer is Nothing. Just munge it lovingly together and all should be well.

~   Rub the burgers with the sugar mix.

~   Brush with a little oil and grill or pan fry till crisp and golden and cooked through – it can be a bit risky under cooking pork.

~   Brush with BBQ sauce and pop back on the grill for a minute or two.

~   Serve on buns drizzled with more BBQ sauce and a great addition is a spoonful of coleslaw on each burger.


Seafood Scraps


delicious-ideas-for-seafood
Freeze in two separate collections – raw and cooked.


A gorgeous use of varied fish scraps, both raw and cooked, is my Seafood Chowder but there are lots of other good ways to use them; fish cakes, salads, risotto, pasta dishes, fish pâté and more – over 30 ideas in my Creative Ways to Use up Leftovers.

Leftover Nuts


roasted-nuts-recipes
This last one is not quite a collection! I use nuts in all sorts of dishes so buy bags of mixed roasted salted nuts and pick out specific nuts as needed. I have almonds and hazelnuts with yogurt and muesli for breakfast, add cashews to curries and salads and to this excellent popcorn recipe. Brazils I give to my real man as I don’t like them and pecans tend to accumulate as I have no specific plans for them.

When I have enough set aside I make something lovely such as the biscotti in my last post.

Several of these ideas are included in Creative Ways to Use up Leftovers together with loads and loads of other ideas for over 450 possible leftovers.

The Magic Biscotti Tin!

In the pub where I work there is a magic biscuit tin for the staff.  Every few days it is mysteriously replenished with delicious crunchy biscotti.  

A few days ago the secret was revealed to me. I met and got chatting to a lovely lady, a customer of the pub, Barbara by name. She admitted to secretly topping up our stash. What a lovely thing to do. We discussed biscotti further and I told her of the fig and black pepper biscotti I used to serve on my menus thus…
biscotti-with-blue-cheese

She asked for the recipe and I thought you might like it too, especially as they are somewhat Christmassy!

Fig and Black Pepper Biscotti – approx 24


240g plain flour
1 (possibly generous) teaspoon coarsely ground black pepper
½ teaspoon baking powder
½ teaspoon salt
15g soft butter
30g caster sugar
1 large egg + 1 egg white
75g chopped dried figs

~   Preheat the oven to 180ºC/350°F/160ºC fan/gas 4.
~   Stir together the first four ingredients.
~   Whisk together the butter and sugar.
~   Lightly beat the egg and the white into the butter mixture.
~   Stir in the dry mixture to form a loose dough.
~   Add the figs and knead together till smooth.
~   On a floured surface into a log about 30cm long.
~   Place onto a baking tray and flatten to about 1½cm high.
~   Bake for 20 minutes till golden and a little firm.
~   Remove from the oven and set aside to cool slightly.
~   Reduce the oven temperature to 150ºC/300°F/130ºC fan/gas 2.
~   When cool enough to handle slice the logs on the diagonal about 1cm thick.
~   Return to the baking tray, cut sides up, and cook for 15-20 minutes till crisp and golden, turning them over after about 10 minutes.
~   Cool on a rack.

fig-and-black-pepper-biscotti


If you fancy these for Christmas, they keep very well (see end of post for storage) so make them a week or two in advance.  I do lots of cooking ahead for Christmas, next Sunday is Stir up Sunday and here is my Christmas Cake recipe.  


Thinking about biscotti and having a collection of salted pecans in the cupboard, as one does, I decided to make …

Salted Pecan and Brown Sugar Biscotti – approx 16


how-to-make-biscotti
Here's a handy image
for Pinterest!
250g soft light brown sugar
250g plain flour
½ teaspoon baking powder
3 eggs
¼ teaspoon vanilla past or a few drips of vanilla extract
120g coarsely chopped roasted and salted pecans

~   Preheat oven to 180ºC/350°F/160ºC fan/gas 4.
~   Stir together the first three ingredients.
~   Lightly beat together the eggs and the vanilla.
~   Stir the dry into the wet and mix to a loose dough.
~   Add the pecans and knead into the dough.
~   Divide the dough into two parts and form two logs about 3cm diameter.
~   Lay onto a baking tray, somewhat apart, and lightly flatten to 1½cm high.
~   Bake for about 25 minutes till a slightly firm on the outside and taking a little colour.
~   Remove from the oven and set aside to cool and firm up a little.
~   Lower the oven heat to 160ºC/325°F/140ºC fan/gas 3.
~   Carefully slice the logs on the diagonal about 1cm thick.
~   Lay cut side up on the baking tray and bake for 15 minutes, turn the biscotti over and cook a further 10 minutes or so till crisp and golden.

biscottti-recipes

Biscotti Information


Biscotti literally means twice cooked. They originate from ancient ltaly where, due to their excellent keeping quality, they were used as convenient food for travellers.  

In Italy they are actually called cantucci; biscotti being a term for biscuits in general (although not biscuits of the American persuasion!).

Being Italian biscotti are traditionally dunked in Italian dessert wine, Vin Santo but are also great dipped in tea, coffee, hot choc or, depending on the biscotti, even mulled wine.


Biscotti Storage 


Make sure your biscotti are utterly, utterly cold then store them in an airtight container, where they should be good, if not for centuries, at least for a couple of weeks or so.

If they are softening pop them back into a medium hot oven for a few minutes resulting in Triscotti!!


charity-cookbook
News from the future …

One day a week I spend sorting books that have been donated to Cornwall Hospice care – I love it.  Recently they published a book of their own, The Great Cornish Cake Bake Cake Book (A collection of favourite recipes and the memories behind them) and the recipe I contributed was this biscotti recipe! 


How to Make The Easiest, Lushest Chocolate Dessert Ever!

Just a quickie!

I’ve been making (and selling) this for years almost beyond number!

Dark Chocolate Pots – makes 8


easy-chocolate-dessert

500ml double cream
80g soft light brown sugar
250g dark chocolate – coarsely chopped
2 eggs

~   Heat together the cream and sugar stirring till the sugar has dissolved.
~   Bring just to a boil and pour over the chocolate.
~   Whisk (or if you’ve chopped the chocolate in a food processor add the hot cream and re-process) till smooth.
~   Cool a few minutes.
~   Whisk or process in the eggs.
~   Pour into a jug and then into attractive dishes (ramekins, cups or pretty bowls) and chill till cold.

The chocolate pot will set but is still soft and idea for dipping goodies into such as wafers, biccies, fruit or even fingers.

Chocolate Pot Variations …


~   Vanilla – add a drip or two or a little vanilla paste together with the eggs.
~   Finely grated orange zest.
~   Finely chopped stem ginger and just a little of the syrup.
~   A little spirit or liqueur – I’m serious when I say “a little”, just a tablespoon because otherwise the finished chocolate pot will be too runny.
~   Add a little chilli syrup, recipe here, or use Lindt’s Excellence Chilli Dark Chocolate.
~   Melt a teaspoonful of coffee granules in with the cream and sugar.
~   Put a little something in the bottom of the dish (salted caramel sauce, raspberries, um … alcohol soaked fruit, etc) before pouring in the chocolate.
~   Add a topping but nothing too sweet or rich as that would be over doing it. Grated chocolate would be good or chopped toasted nuts, for instance.
~   Your go – let me know of any good ideas you have.

Chocolate pots are a lovely Christmas dessert as you can prepare them a day or two in advance and, as I said, it is so easy. 
dark-chocolate-pots